9.2 KiB
Security框架封装集成多方登录 使用指南
先上效果图
单独使用例子工程:https://github.com/yexuejc/springboot-security-login-simple
- 本项目依赖不向下传递
引入依赖 pom.xml
 <dependencies>
     <!-- Spring Security -->
     <dependency>
         <groupId>org.springframework.boot</groupId>
         <artifactId>spring-boot-starter-security</artifactId>
     </dependency>
 </dependencies>
相关文件说明 所有核心文件都在 com.yexuejc.springboot.base.security 包下
现附上系统实现逻辑图

1.com.yexuejc.springboot.base.security.SecurityConfig
Security 核心,本文件并未启动Security,需继承;然后继承类上加上@EnableWebSecurity注解就启动Security了。
- 实现loadUserByUsername()方法;自定义逻辑处理登录账号,返回登录账号相关信息
- 实现loginHodler()方法;自定义处理登录成功filter.setAuthenticationSuccessHandler()和失败filter.setAuthenticationFailureHandler()的处理
- 继承configure(HttpSecurity http) 完善更多security过滤配置
- 例子com.yexuejc.springboot.base.security.MySecurityConfig
注: 代码中抛出的相关异常拦截在filter.setAuthenticationFailureHandler()中处理,参考MySecurityConfig
filter.setAuthenticationFailureHandler((request, response, exception) -> {
            response.setContentType("application/json;charset=UTF-8");
            response.setStatus(HttpStatus.UNAUTHORIZED.value());
            Resps resps = new Resps();
            if (exception instanceof DisabledException) {
                resps.setErr(RespsConsts.CODE_FAIL, new String[]{BizConsts.BASE_IS_LOCK_MSG});
            } else if (exception instanceof AccountExpiredException) {
                resps.setErr(RespsConsts.CODE_FAIL, new String[]{BizConsts.BASE_IS_EXPIRE_MSG});
            } else if (exception instanceof CredentialsExpiredException) {
                resps.setErr(BizConsts.BASE_LOGIN_IS_EXPIRE_CODE, new String[]{BizConsts.BASE_LOGIN_IS_EXPIRE_MSG});
            } else if (exception instanceof LockedException) {
                resps.setErr(RespsConsts.CODE_FAIL, new String[]{BizConsts.BASE_IS_LOCKED_MSG});
            } else if (exception instanceof AuthenticationCredentialsNotFoundException) {
                resps.setErr(RespsConsts.CODE_FAIL, new String[]{BizConsts.BASE_CREDENTIALS_NOT_FOUND_MSG});
            } else if (exception instanceof ThirdPartyAuthorizationException) {
                resps.setErr(RespsConsts.CODE_FAIL, new String[]{exception.getMessage()});
            } else if (exception instanceof BadCredentialsException) {
                resps.setErr(RespsConsts.CODE_FAIL, new String[]{BizConsts.BASE_PWD_IS_ERR_MSG});
            } else if (exception instanceof UsernameNotFoundException) {
                resps.setErr(RespsConsts.CODE_FAIL, new String[]{BizConsts.BASE_ACCOUNT_NOT_FOUND_MSG});
            } else if (exception instanceof UserNotAuthoriayException) {
                resps.setErr(RespsConsts.CODE_FAIL, new String[]{exception.getMessage()});
            } else {
                resps.setErr(RespsConsts.CODE_FAIL, new String[]{BizConsts.BASE_SYS_ERR_MSG});
            }
            response.getWriter().write(JsonUtil.obj2Json(resps));
            response.getWriter().close();
        });
2.com.yexuejc.springboot.base.security.UserDetailsManager
获取登录用户信息
- 需要实现com.yexuejc.springboot.base.security.inte.UserService
- 例子com.yexuejc.springboot.base.security.UserServiceImpl
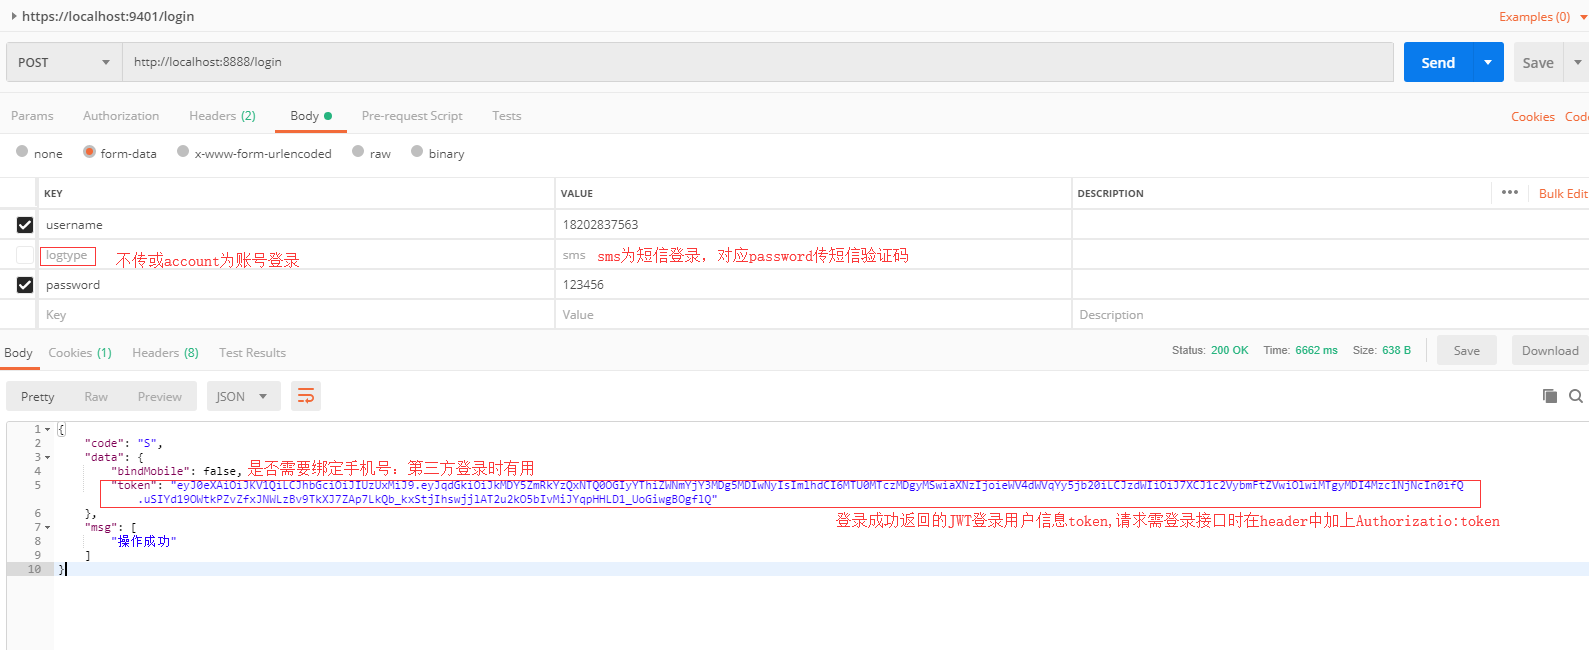
3.com.yexuejc.springboot.base.security.LoginToken
登录成功封装至JWT的登录用户信息
4.com.yexuejc.springboot.base.security.ConsumerUser
登录成功封装至redis的登录用户信息
5.com.yexuejc.springboot.base.security.ConsumerToken
登录请求时(/login)用户登录参数信息
6.com.yexuejc.springboot.base.security.ConsumerSecurityContextRepository
登录校验token正确性,返回登录用户(从redis中获取)
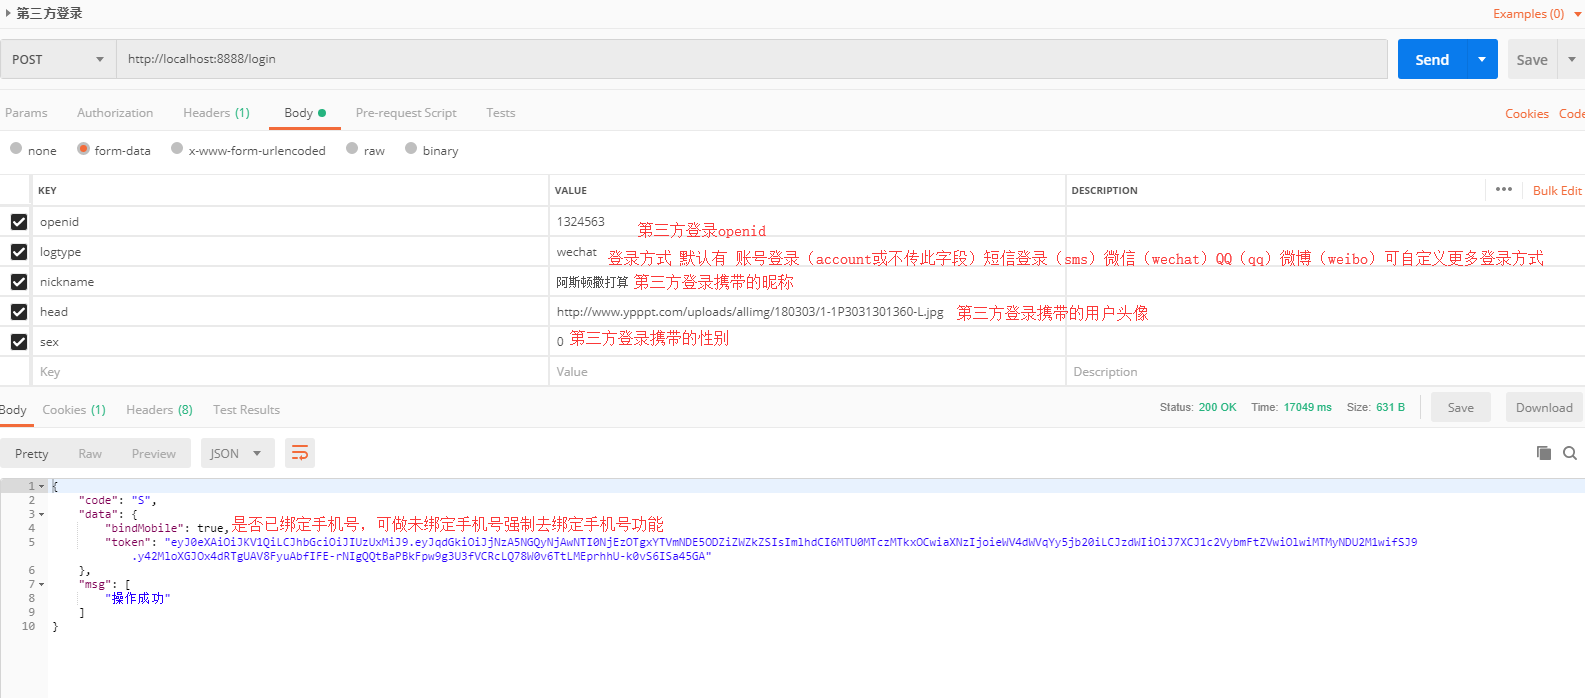
7.com.yexuejc.springboot.base.security.ConsumerAuthenticationProvider
登录时账号校验(原为密码校验,重写之后增加校验短信验证码,第三方openid)
8.com.yexuejc.springboot.base.security.ConsumerAuthenticationProcessingFilter
重写登录拦截,集成多种登录方式到/login
使用example
- 下载本项目至本地,找到yexuejc/yexuejc-springboot/yexuejc-springboot-base/src/test/java/com/yexuejc/springboot/base/ApplicationRun.java 至接run
- 测试环境配置如下(测试运行环境都在test下面)
2.1 pom.xml
- mybatis-plus数据库框架
- HikariCP数据库连接池
- 本地数据库H2
- JJWT作为登录凭证token
- redis 存储登录用户信息
关于这些相关框架、工具不做详解,有兴趣可以去学习,这些都可以用你自己熟悉的替换
<!-- JJWT -->
<dependency>
    <groupId>io.jsonwebtoken</groupId>
    <artifactId>jjwt</artifactId>
    <optional>true</optional>
</dependency>
<!-- 使用Redis -->
<dependency>
    <groupId>org.springframework.boot</groupId>
    <artifactId>spring-boot-starter-data-redis</artifactId>
    <optional>true</optional>
</dependency>
<dependency>
    <groupId>redis.clients</groupId>
    <artifactId>jedis</artifactId>
    <optional>true</optional>
</dependency>
<!-- HikariCP数据库连接池(JDK1.8) -->
<dependency>
    <groupId>com.zaxxer</groupId>
    <artifactId>HikariCP</artifactId>
    <optional>true</optional>
    <scope>test</scope>
</dependency>
<!-- springboot mybatis-plus-->
<dependency>
    <groupId>com.baomidou</groupId>
    <artifactId>mybatis-plus-boot-starter</artifactId>
    <optional>true</optional>
    <scope>test</scope>
</dependency>
<!-- 内存数据库h2-->
<dependency>
    <groupId>com.h2database</groupId>
    <artifactId>h2</artifactId>
    <optional>true</optional>
    <scope>test</scope>
</dependency>
2.2 对应的application.properties
-
redis 0库存储登录用户信息,1库存储短信验证码
-
H2数据库 创建数据库表 consumer(用户表) schema.sql; 增加一条用户数据data.sql
启动项目后会自动运行这两个脚本,自此H2数据库中就会有一条用户数据,测试时可以用来登录
PS:项目运行成功后可以访问 http://localhost:8888/h2-console 登录到数据库 -
mybatis-plus 详情http://mp.baomidou.com/
#========================================================================================================================
# security相关
#reids
#开启指定redis库db0默认开启
yexuejc.redis.db1=true
spring.redis.jedis.pool.max-active=100
spring.redis.jedis.pool.max-idle=10
spring.redis.jedis.pool.min-idle=3
spring.redis.host=121.42.165.89
spring.redis.password=
spring.redis.port=16379


#db

spring.h2.console.path=/h2-console
spring.h2.console.enabled=true
spring.h2.console.settings.web-allow-others=true
spring.datasource.username=sa
spring.datasource.password=123456
spring.datasource.url=jdbc:h2:mem:test;MODE=PostgreSQL
spring.datasource.driver-class-name=org.h2.Driver
spring.datasource.schema=classpath:db/schema.sql
spring.datasource.data=classpath:db/data.sql

#========================================================================================================================
#mybatis-plus
mybatis-plus.mapper-locations=classpath*:mapper/*.xml
#实体扫描,多个package用逗号或者分号分隔
mybatis-plus.type-aliases-package=com.yexuejc.springboot.base.security.domain
#主键类型0:"数据库ID自增", 1:"用户输入ID",2:"该类型为未设置主键类型", 3:"全局唯一ID UUID",4:全局唯一ID (UUID),5:字符串全局唯一ID (idWorker 的字符串表示);
mybatis-plus.global-config.db-config.id-type=uuid
mybatis-plus.global-config.db-config.db-type=POSTGRE_SQL
#字段策略 0:"忽略判断",1:"非 NULL 判断"),2:"非空判断"
mybatis-plus.global-config.db-config.field-strategy=not_empty
#驼峰下划线转换
mybatis-plus.global-config.db-config.column-underline=true
#逻辑删除配置(下面3个配置)
mybatis-plus.global-config.db-config.logic-delete-value=true
mybatis-plus.global-config.db-config.logic-not-delete-value=false
#配置返回数据库(column下划线命名&&返回java实体是驼峰命名),自动匹配无需as(没开启这个,SQL需要写as: select user_id as userId)
mybatis-plus.configuration.map-underscore-to-camel-case=true
mybatis-plus.configuration.cache-enabled=false
#========================================================================================================================
附图